Coupling DynEarthSol with GoSPL
This tutorial explains how to run DynEarthSol coupled with GoSPL (Global Scalable Paleo Landscape Evolution) to simulate the interaction between tectonic deformation and surface processes like erosion and sediment transport.
What is GoSPL?
GoSPL is a Python-based landscape evolution model that simulates:
- River incision and sediment transport
- Hillslope diffusion
- Marine deposition
- Flexural isostasy
When coupled with DynEarthSol, you can study how tectonic processes (uplift, extension, compression) interact with surface erosion over geological timescales.
Prerequisites
Before starting, ensure you have:
- ✅ GoSPL installed through conda
- ✅
gospl_extensions - ✅ DynEarthSol compiled with GoSPL support (the source tree must include the
gospl_driverdirectory), which needs a C++ toolchain andmake
GOSPL=1 ./build.sh builds an image with the conda environment,
gospl_extensions and a 3D executable already inside. If you use it, jump to
Run with Docker.
On WSL, if the script fails with docker: command not found, install Docker
Desktop on Windows, then enable it for WSL: Settings → Resources → WSL
Integration → check "Enable integration with my default WSL distro".
If instead you see
ERROR: permission denied while trying to connect to the Docker daemon socket at unix:///var/run/docker.sock
add yourself to the docker group:
sudo usermod -aG docker $USER
then restart a new shell to take effect. When starting a plain new shell in the same
session isn't enough, you need to restart wsl (wsl --shutdown
from Windows, then reopen the terminal).
Install GoSPL
Refer to https://gospl.readthedocs.io/en/latest/getting_started/installConda.html.
To recap the quickest way,
curl -fsSL "https://github.com/conda-forge/miniforge/releases/latest/download/Miniforge3-Linux-$(uname -m).sh" -o /tmp/miniforge.sh
bash /tmp/miniforge.sh -b -p $HOME/miniforge3
rm /tmp/miniforge.sh
$HOME/miniforge3/bin/mamba create -y -n gospl -c geodels -c conda-forge gospl python=3.11
$HOME/miniforge3/bin/conda clean -afy
Install gospl_extensions
GoSPL is written in Python and DynEarthSol in C++. gospl_extensions is the
bridge between them. It provides:
- a C++ entry point:
libgospl_extensions.soand a header, so DynEarthSol can drive a Python model from compiled code; EnhancedModel: a GoSPL subclass that can be stepped externally, take imposed velocities and hand back an elevation change;- interpolation between the DES mesh and the GoSPL mesh, which are built independently and at different resolutions.
git clone https://github.com/GeoFLAC/gospl_extensions.git
cd gospl_extensions/cpp_interface
conda activate gospl
make install-local
You will see this message if successful:
Installing locally for DynEarthSol integration...
✅ Installed locally to gospl_extensions/lib and gospl_extensions/include
Build DynEarthSol with GoSPL support
- Set
use_gospl = 1in Makefile. - Set
GOSPL_EXT_DIR: e.g.,GOSPL_EXT_DIR = $(HOME)/opt/gospl_extensions - Check
CONDA_ENV_PATH, the gospl environment. It defaults to$(HOME)/miniforge3/envs/gospl, where the Miniforge install above puts it; set it only if your environment is elsewhere. - Set
ndims = 3, which is required for the GoSPL coupling. - Set
usemmg = 1, which is recommended: MMG mesh optimization during remeshing (see Adaptive mesh refinement with MMG). - Build outside the gospl environment, which keeps the compiler off
conda's libraries:
conda deactivate   # if any environment is active
make clean
make -j4
When the build is successful, you should see the following message:
==============================================
✅ DynEarthSol built with GoSPL support!
==============================================
🚀 To run with GoSPL support:

Use the wrapper script (PYTHONPATH is set automatically):
  ./dynearthsol-gospl your_input.cfg

Or set PYTHONPATH manually and use the regular executable:
  PYTHONPATH=/home/auser/opt/gospl_extensions/cpp_interface:$PYTHONPATH ./dynearthsol3d your_input.cfg
==============================================
Verify the build
Run these four checks before moving on:
./dynearthsol3d --help | grep gospl                # options registered?
conda activate gospl && python -c "import gospl"   # GoSPL importable?
ldd dynearthsol3d | grep python                    # linked to Python?
cat dynearthsol-gospl                              # wrapper script written?
The build also writes dynearthsol-gospl, a wrapper script that sets
PYTHONPATH for you. If it is missing, the build did not complete with
use_gospl = 1.
How coupling works
One coupling event, between the previous event at and the
current one at (gospl_coupling_frequency DES steps apart in
steps mode):
 DES time    t_prev   ────────── DES steps ──────────    t_now
               │                                           │
               │◄────────── Δt = t_now − t_prev ──────────►│
               │                                           │
          coord_prev                                   coord_now
               └───── Δcoord = coord_now − coord_prev ─────┘

 At t_now:

   DES ───────── v̄ = Δcoord / Δt  (vx, vy, vz) ─────────►  GoSPL
                                                             │  advances Δt:
                                                             │  advection, uplift,
                                                             │  incision, diffusion
   DES ◄──── Δh (erosion + diffusion, uplift removed) ───────┘

   DES then sets   z_surface ← z_surface + Δh

DES3D and GoSPL exchange data in a way inspired by the ASPECT-FastScape simple coupling scheme:
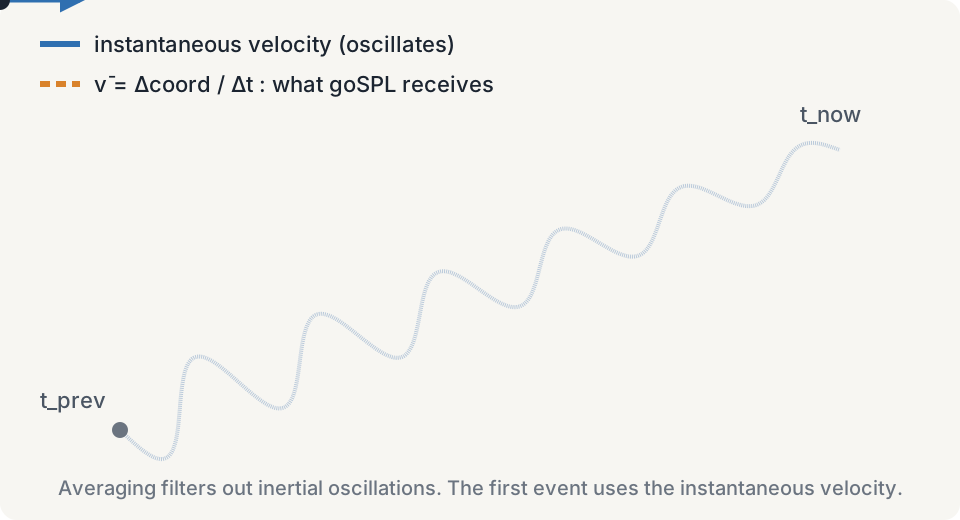
- DES → GoSPL: At each coupling event, DES passes time-averaged
surface velocities to GoSPL. The velocity is , where is the
displacement of each surface node since the previous coupling event and
is the model time elapsed since then. Time-averaging filters
out quasi-dynamic inertial oscillations that would otherwise perturb
GoSPL's drainage network. The first event has no previous event, so it
uses the instantaneous velocity.
- GoSPL → DES: GoSPL advances by : it applies the velocities (horizontal advection and vertical uplift), river incision and hillslope diffusion, and returns an elevation change at every surface node.
- Tectonic uplift accounting: contains only the erosion
and diffusion component. GoSPL subtracts the uplift
() before returning it, because DES already applied the
same displacement through its Lagrangian mechanical solver; returning
the full change would count the tectonic uplift twice. DES adds
to the z-coordinates of its surface nodes. Note that
is not :
is DES's tectonic displacement, while is the surface-process
change added on top of it.

- Persistent drainage state: GoSPL's river network state is preserved across DES remeshing events so that drainage divides are not reset after mesh adaptation.
- Padded GoSPL mesh: The GoSPL mesh extends beyond the DES domain
by a configurable padding fraction (
gospl_mesh_padding, default 0.1) to avoid edge artifacts during extension.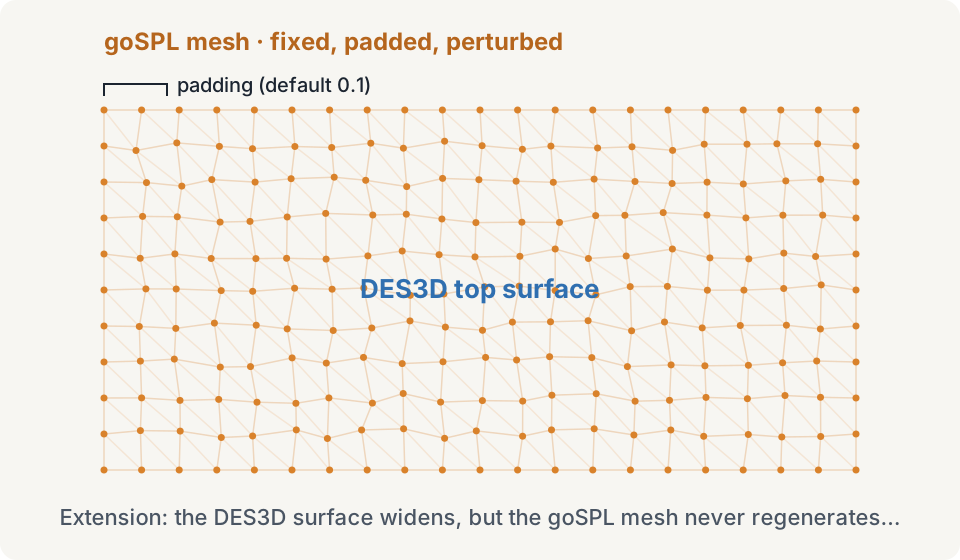
What crosses the interface
| Direction | What is passed | Driver call |
|---|---|---|
| DES → GoSPL, once | Initial surface elevation, seeding GoSPL's hGlobal | apply_elevation_data() |
| DES → GoSPL, each event | Time-averaged surface velocity (vx, vy, vz) | set_surface_velocity() |
| GoSPL → DES, each event | Elevation change from erosion and diffusion only | run_and_get_erosion() |
| GoSPL → DES, on demand | Current elevation at any query point | interpolate_elevation_to_points() |
You never call these directly, but knowing the names makes the log output readable.
Coupling modes
gospl_coupling_mode | Trigger parameter | Meaning |
|---|---|---|
steps (default) | gospl_coupling_frequency | GoSPL runs every N DES steps |
time | gospl_coupling_interval_in_yr | GoSPL runs every T model years |

Known limitations
- The coupling interval is a trigger, not a clamp. In
timemode,gospl_coupling_interval_in_yronly decides when coupling fires. Thedthanded to GoSPL is the time accumulated since the last event, so if DES's adaptive time step exceeds the interval, coupling fires every DES step and GoSPL's step silently becomes DES'sdt. There is no sub-stepping or truncation back to the nominal interval. - Remeshing between coupling events. The coupling clock is unaffected by remeshing: Coupling occurs at the set schedule whether remeshing occurrs during a coupled interval or not. GoSPL's elevation state is not re-seeded from DES afterwards: i.e., GoSPL owns thetopography. When remeshing occurs and changes the surface node number, the average velocity cannot be computed and the instantaneous velocity is used instead. If a remesh leaves that count unchanged (uncommon but possible when only the interior remeshes), node identity is not verified and the velocity for the next coupling event can difference unrelated nodes. So, treat the first coupling event after a remesh with caution.
- The GoSPL mesh is fixed at startup. It is generated once, sized to the
DES model's initial top surface plus
gospl_mesh_paddingon each side, and never regenerated (on restart an existing mesh file is reused as is). The padding fraction therefore bounds how much lateral extension the DES model can accumulate before its surface approaches the GoSPL mesh boundary, where edge artifacts can reappear. Nothing warns you when this happens, so choose a generousgospl_mesh_paddingfor strongly extensional models.
Quick Start
Step 1: Enable GoSPL in your configuration
| Parameter | Default | Description |
|---|---|---|
surface_process_option | 0 | Set to 11 to enable GoSPL |
surface_process_gospl_config_file | (empty) | Path to your GoSPL YAML file |
gospl_coupling_mode | steps | steps or time — controls what the coupling interval means |
gospl_coupling_frequency | 1 | GoSPL runs every N DES steps (used when gospl_coupling_mode = steps) |
gospl_coupling_interval_in_yr | 1000 | GoSPL runs every T model years (used when gospl_coupling_mode = time) |
gospl_velocity_coupling | true | Pass surface velocities to GoSPL for smoother drainage-network evolution |
gospl_mesh_resolution | -1 | GoSPL grid spacing in meters (-1 = automatic: nx = ny = floor(√n_top) + 1) |
gospl_mesh_padding | 0.1 | Fractional domain padding for GoSPL mesh (avoids boundary artifacts) |
gospl_mesh_perturbation | 0.3 | Grid randomization (0–1) |
For models with slow erosion rates, you can set gospl_coupling_frequency = 100 or higher to speed up computation. GoSPL will run less often but with accumulated time. Alternatively, use gospl_coupling_mode = time to couple at fixed model-time intervals regardless of step size.
[control]
surface_process_option = 11
surface_process_gospl_config_file = gospl_config.yml
gospl_coupling_mode = steps
gospl_coupling_frequency = 100      # Run GoSPL every 100th DynEarthSol time step
gospl_velocity_coupling = true      # Pass surface velocities to GoSPL
gospl_mesh_resolution = 500         # in meters
gospl_mesh_padding = 0.1            # extend GoSPL mesh 10 % beyond DES domain
gospl_mesh_perturbation = 0.3       # 30 % of random perturbations, +0.5/-0.5 x h
Step 2: Create a GoSPL configuration file
Create a YAML file for GoSPL settings. The coupling uses the EnhancedModel
from gospl_extensions, not stock GoSPL, so a standard GoSPL configuration may
not work. Start from the template below or from the
bundled example, and keep these
five sections: domain, time, spl, diffusion and output.
name: coupled_simulation

domain:
    npdata: ['./gospl_mesh','v','c','z']
    flowdir: 1
    seadepo: False
    bc: 'oooo'   # boundary conditions per edge N,E,S,W (o=open, f=fixed, w=wall)

output:
    dir: 'coupling_test' # Output directory

time:
  start: 0.0
  end: 1000000.0   # 1 Myr
  tout: 5000.0     # 5 kyr output interval
  dt: 1000.0       # 1 kyr time step (to be overwritten by DynEarthSol)

spl:
    K: 4.e-6
    d: 0.
    m: 0.4

diffusion:
    hillslopeKa: 0.2
    hillslopeKm: 1.0

sea:
    position: -10.

climate:
  - start: 0.
    uniform: 1
The keys you will change most often:
| Key in the YAML | What it sets |
|---|---|
spl: K | Bedrock river incision rate (erodibility) |
spl: m, spl: n | Drainage-area and slope exponents of the stream power law |
diffusion: hillslopeKa | Hillslope diffusivity, m²/yr |
domain: flowdir | Flow routing (6 is multi-direction) |
domain: bc | Boundaries, in the order N,E,S,W (o=open, f=fixed, w=wall): e.g., 'wowo' opens east and west closing north and south |
domain: seadepo | Marine deposition on or off |
sea: position | Sea level in metres relative to the initial surface |
Output timing
GoSPL writes output on its own clock, every time: tout years, but only at a
coupling event. Each event runs GoSPL for one step, and GoSPL checks for output
at that step's start and end. Its clock starts at time: start and advances by
the coupling interval, so it trails DES time by whatever has accumulated since
the last event. Three consequences:
- Outputs snap to coupling events. A file is written at the first coupling
event at or after each multiple of
tout. If the coupling interval dividestout, asgospl_coupling_mode = timemakes easy, outputs are exactlytoutapart; otherwise the spacing is uneven. - A coupling interval longer than
toutmislabels outputs. Every event then writes, but the time stamped in the output is the nominal one,start + k·tout, which falls further behind the model time with each write. Instepsmode the interval in years varies with DES's adaptive time step, so this can happen without you noticing. dtandendstill matter. DES overrides them for stepping, but when GoSPL reads the YAML it raisestouttodtif smaller, and lowers it toend − startifstart + tout > end. Keepdt ≤ toutandendat least the DES run length,max_time_in_yr.
Set tout equal to DES's output_time_interval_in_yr and couple at a divisor
of it. GoSPL frames still fall on coupling events, so they can sit up to one
coupling interval from the matching DES frame.
Step 3: Run your simulation
Run from the directory that holds the GoSPL YAML: the path in
surface_process_gospl_config_file is resolved relative to the working
directory, not to the .cfg file.
./dynearthsol-gospl my_simulation.cfg
DynEarthSol will automatically:
- Generate a mesh for GoSPL at startup
- Exchange elevation data between the two models
- Apply erosion/deposition changes to the DynEarthSol surface
In this example,
- the mesh is generated automatically and saved as
gospl_mesh.npzin your working directory. - DynEarthSol outputs will be saved in the working directory.
- GoSPL outputs will be saved in the
coupling_testdirectory.
Run with Docker
GOSPL=1 ./build.sh in the DynEarthSol repository root builds the image
dynearthsol/gcc-11-gospl. It has the gospl conda environment (activated in
every login shell), gospl_extensions and a 3D dynearthsol3d already inside,
so none of the setup above is needed on the host. Mount a directory for your
case and run from it:
docker run --rm -it -v /path/to/case:/home/human/case dynearthsol/gcc-11-gospl bash
cd ~/case
cp ~/DynEarthSol/gospl_driver/examples/* .
~/DynEarthSol/dynearthsol-gospl ./gaussian-weakzone-3d-with-gospl.cfg
The cp above seeds the mounted directory with the bundled example — copy in
your own .cfg and GoSPL YAML instead once you have one.
To stop a run started this way, find its container ID and kill it from another terminal:
docker ps
docker kill [CONTAINER ID]
Worked example: a Gaussian weak zone rift
The gospl_driver/examples
directory holds a ready-to-run pair of files: a DES config,
gaussian-weakzone-3d-with-gospl.cfg, and its GoSPL YAML,
gospl_config_gaussian_weakzone_3D.yml. The parameters were chosen to match
an ASPECT + FastScape reference model, so the results are comparable to
published work. The weak zone's Gaussian along-strike shift (weakzone_option = 4) is explained in Weak zones.
| Setting | |
|---|---|
| Domain | 100 × 80 × 10 km, 1 km base mesh resolution, GoSPL mesh at 500 m |
| Forcing | ±1.5 cm/yr extension in x; a Gaussian weak zone seeds the rift |
| Duration | 1 Myr, output every 20 kyr, coupling every 200 steps |
| Surface law | K = 1e-5, m = 0.4, n = 1, hillslope Ka = 1e-2 m²/yr |
| Boundaries | East and west open, north and south fixed base-level outlets (bc: 'fofo') |
| Sea level | −2000 m, so marine processes stay inactive |
Exercise 1: run the reference case
conda activate gospl
cd DynEarthSol/gospl_driver/examples   # the YAML path resolves from here
../../dynearthsol-gospl ./gaussian-weakzone-3d-with-gospl.cfg
If you prefer to manage the environment yourself, set PYTHONPATH and run the
executable directly:
conda activate gospl
export PYTHONPATH="$HOME/opt/gospl_extensions/cpp_interface:${PYTHONPATH}"
cd DynEarthSol/gospl_driver/examples
../../dynearthsol3d ./gaussian-weakzone-3d-with-gospl.cfg
Watch for the coupling messages in the log. Output is written to
output_gaussian_weakzone_3D/ every 20 kyr.
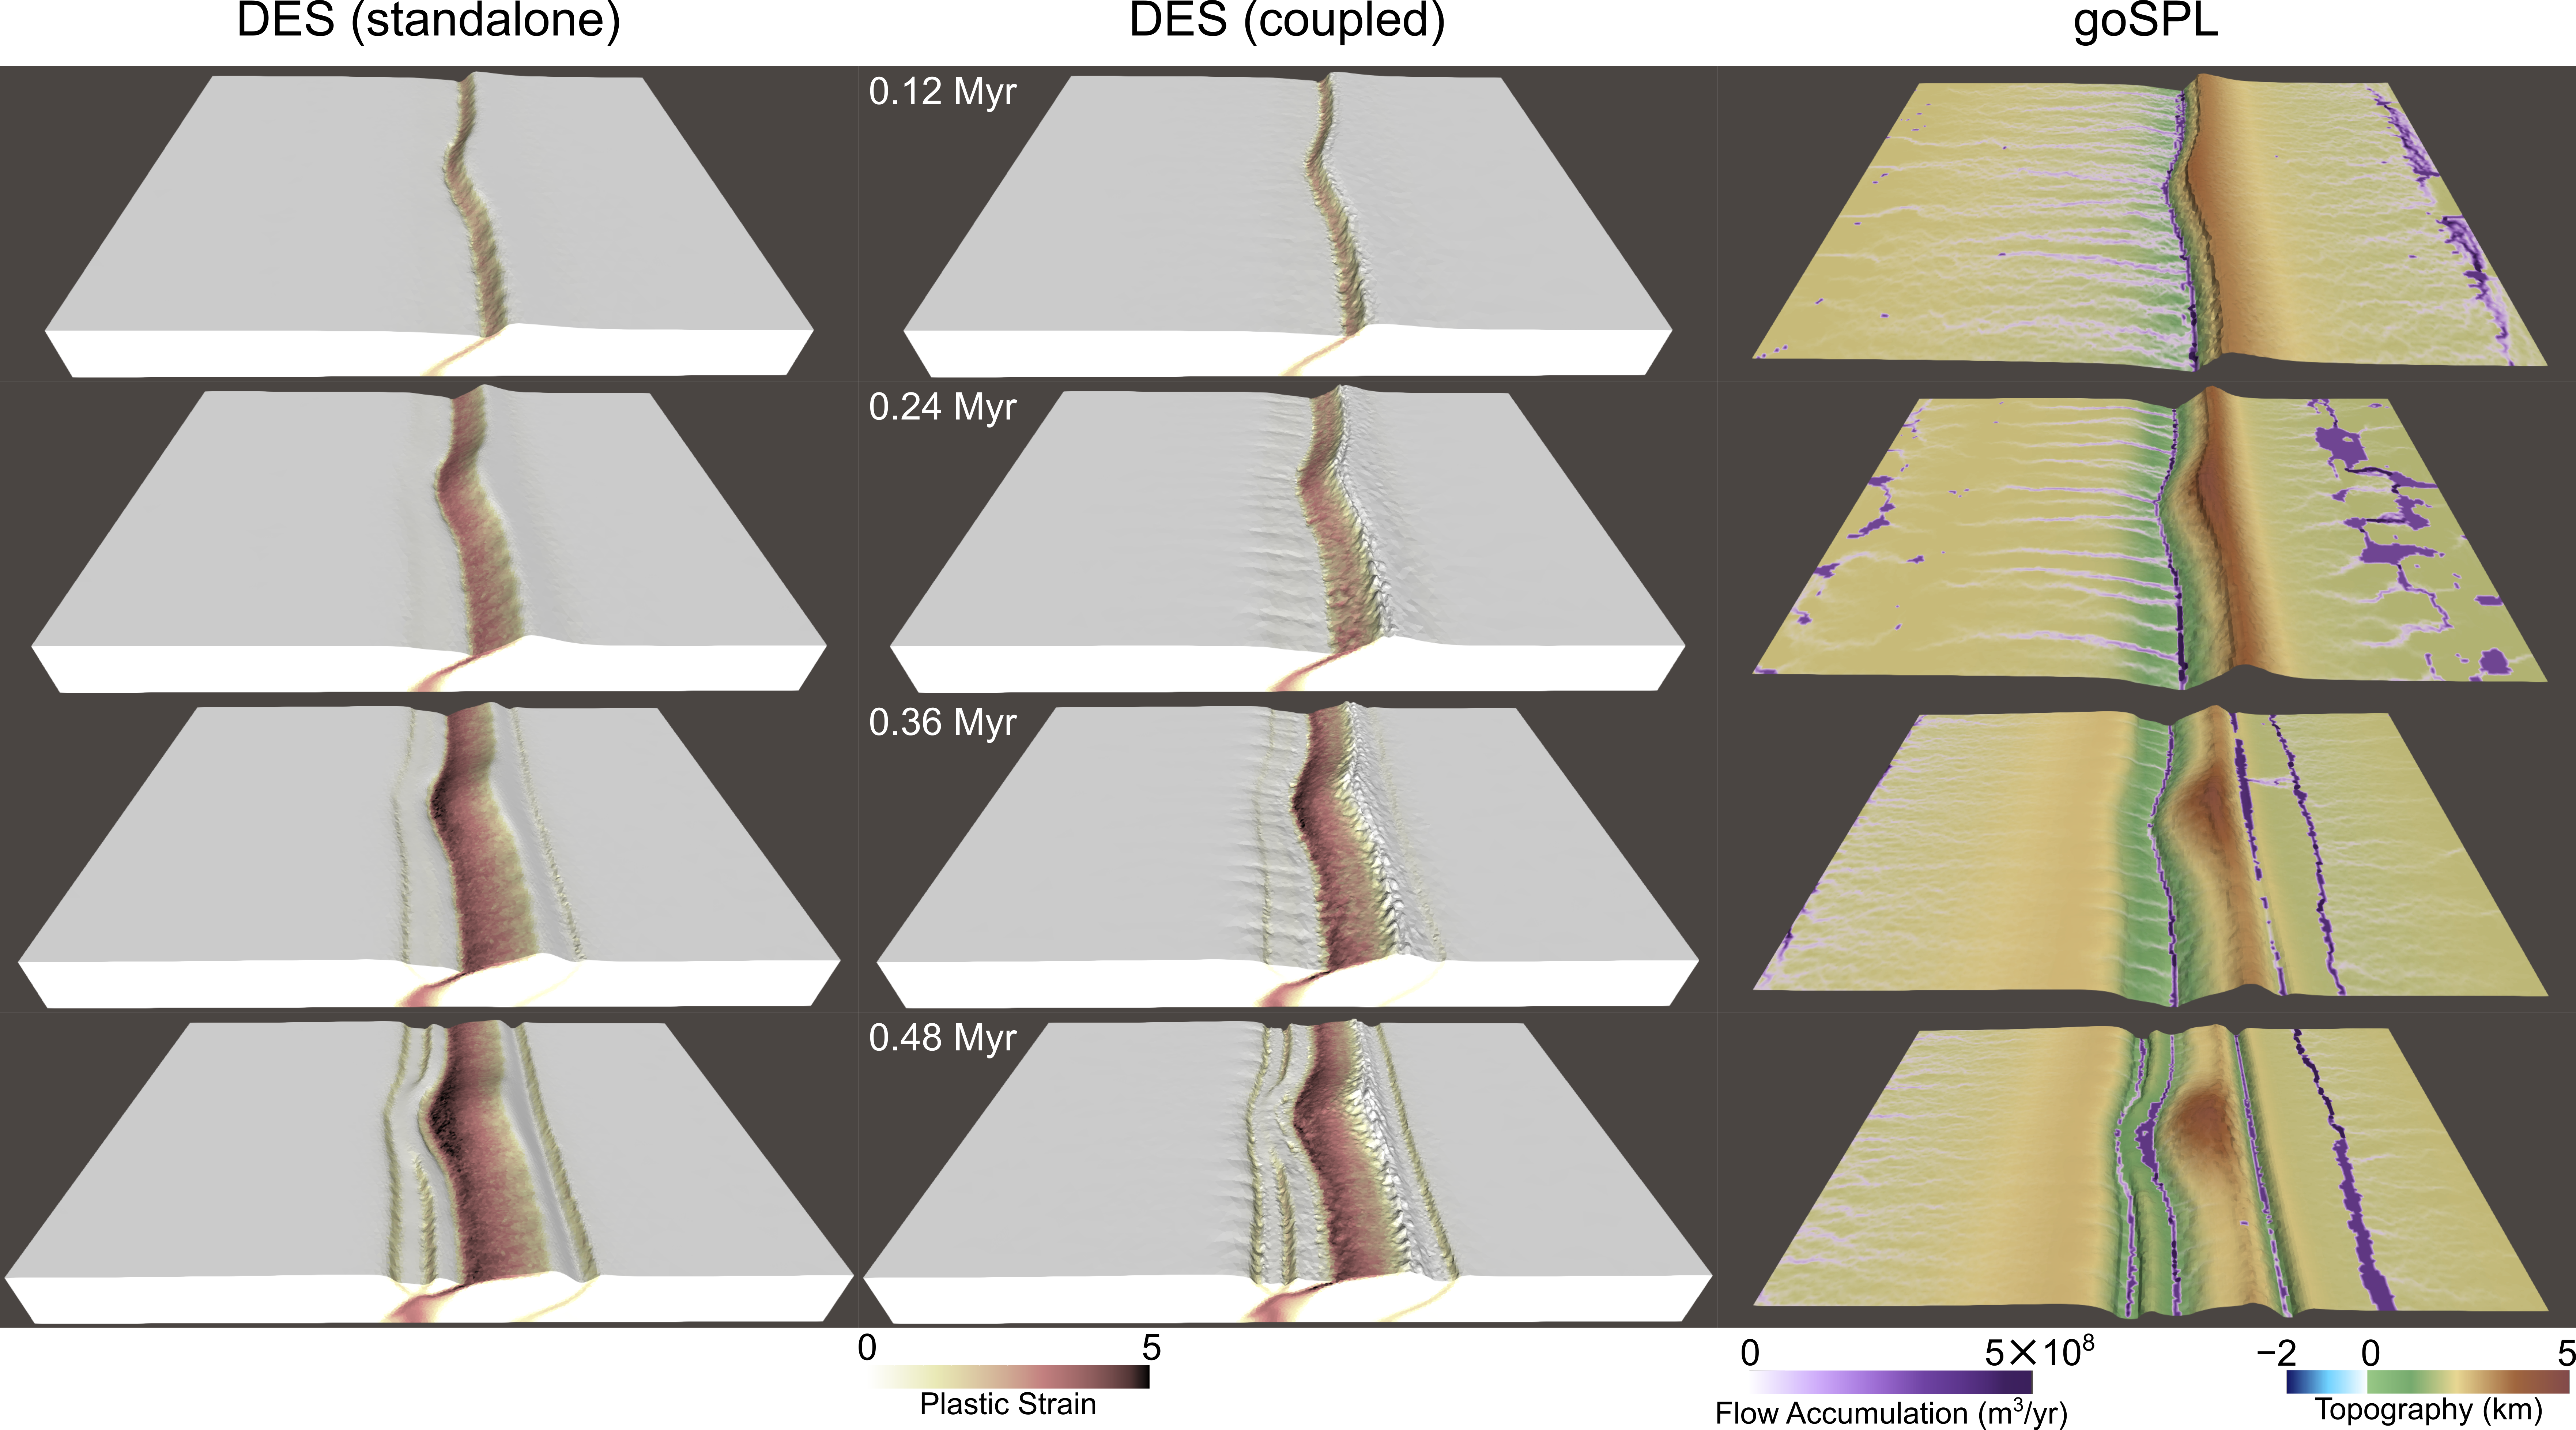
Things to look for as the run proceeds:
- a rift valley opening above the weak zone, with uplifted flanks;
- channels organizing down those flanks as the relief grows;
- sediment accumulating in the axial low.
Exercise 2: vary the erodibility
Change one line in the YAML, spl: K, and rerun. Nothing needs rebuilding.
| Run | spl: K | What you should see |
|---|---|---|
| Reference | 1.0e-5 | Rivers keep pace with uplift; moderate flank relief |
| Weak erosion | 1.0e-6 | Tectonics dominates: higher, sharper flanks, little sediment |
| Strong erosion | 1.0e-4 | Flanks worn down as they rise; the valley fills faster |
As an optional second experiment, set gospl_coupling_frequency = 50 in the
.cfg and check whether the result changes. If it does, the coupling interval
was too coarse.
Change one parameter at a time, and keep a log of what you changed.
Troubleshooting
Build errors
| Message | Cause and fix |
|---|---|
cannot find -lpython3.11 | Wrong conda path. Make sure the gospl environment exists (e.g. ~/miniforge3/envs/gospl) with Python 3.11, or update CONDA_ENV_PATH in the Makefile |
cannot find -lgospl_extensions | Extensions built elsewhere. Update GOSPL_EXT_DIR in the Makefile |
gospl-driver.hpp: No such file | gospl_driver is not in the DynEarthSol source directory |
Runtime errors
| Message | Cause and fix |
|---|---|
GoSPL not initialized, or an ImportError for gospl | The GoSPL Python package was not found. Activate the environment: conda activate gospl |
No module named 'gospl_python_interface' | Add the gospl_extensions/cpp_interface directory to PYTHONPATH, or use the dynearthsol-gospl wrapper |
The input file is not found, or Cannot find gospl_config.yml | Run from the directory that holds the YAML, or use an absolute path |
Most of these come from a path assumption. Nearly all are fixed by editing a directory variable in the Makefile or by changing directory before running. To avoid depending on the working directory, use an absolute path:
surface_process_gospl_config_file = /full/path/to/gospl_config.yml
Intermittent PETSc error
Error in run_and_get_erosion: error code 77
[0] Unexpected state: bad hmax in TSAdaptChoose()
Error: GoSPL run_and_get_erosion failed
Cause: a floating-point edge case in PETSc's adaptive time stepper inside GoSPL's marine deposition solver. The run recovers: DynEarthSol skips applying erosion for that one step.
Avoiding it: if sea level is well below the model surface, marine
deposition is inactive anyway. Set seadepo: false in the GoSPL YAML to skip
that code path entirely. Do this only when sea level is far below the surface,
as it is in the worked example.
Simulation runs slowly
Cause: GoSPL is being called every time step.
Solution: Increase the coupling frequency:
gospl_coupling_frequency = 200
Next Steps
- Copy the example pair to start your own model, rather than writing configs from scratch
- Learn about GoSPL configuration options
- See the example configurations and their README for the parameter rationale
- Read
gospl_driver/README.mdfor the coupling in detail